
How are you all on this very fine day? Hope you're all doing great. I have something for you all. Yes, it's a graphic designing tutorial where I'll be showing (in as much depth as possible) how to colorize a black and white picture in the software, gimp.
So, let's get started, shall we?

STEP ONE:
Open the picture you want to colorize in the software. Make sure it's in HD quality. We don't want a picture which is in not so nice quality since this is our first basic tutorial. In my case, I chose a picture of Miranda Kerr.
 STEP TWO:
For each part, we'll be working on different layers. Clothes, eyes, lips, skin, hair and background will have different layers. Click on layer and add a new layer. A pop up box will appear where you have check on the transparency option at the bottom. Name the layer according to the part you want to color first. I always start off by coloring the clothes.

STEP THREE:
On the selected layer, which in my case is clothes, change the mode from normal to color. Select your desired color, I am going for a light purple color which will change a bit because of the mode. Select the brush tool, from the tool box and start coloring back and forth.

STEP FOUR:
It will look something like this. Don't worry about messing up, if you do.
 STEP FIVE:

STEP SIX:
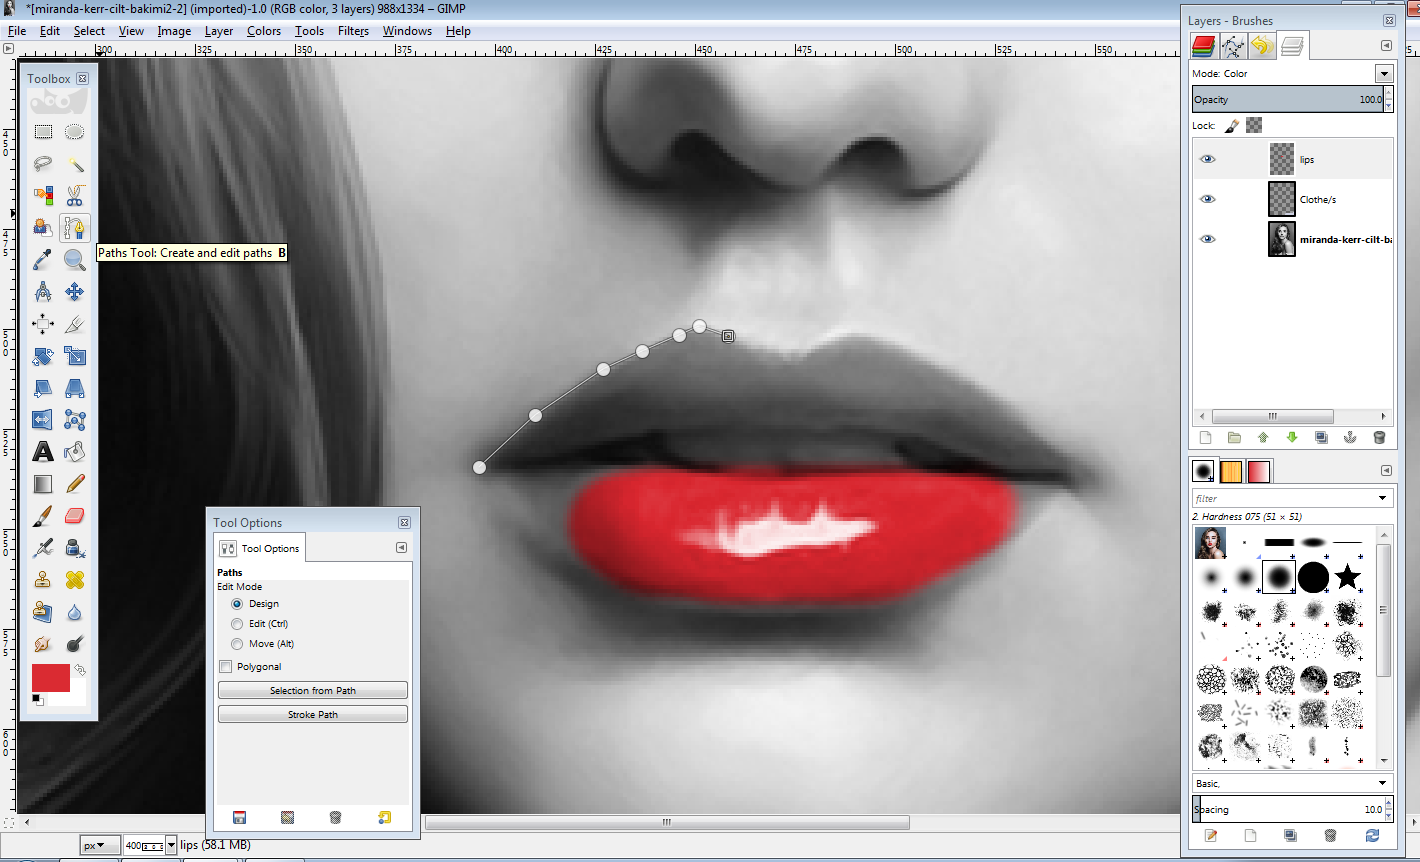
Since I was messing up that is, accidentally coloring the skin red. I am going to select the path tool from the tool box. Path tool helps you select a certain part of your picture via the path you created. Just create a path around the lines of lips.
STEP SEVEN:
Make sure you connect the initial point with the final point. Once the path the is created, right click anywhere on the picture. Put your cursor on 'Select' and click on 'From Path'.
 STEP EIGHT:
Now that on lips are selected, freely color all around the lips because it won't color outside the boundary or path you created.

STEP NINE:
Again repeating the previous step, I added a new transparent layer and named it eyes. I googled a picture of Miranda Kerr to see her eye color. I think blue looks pretty cool. Selecting the mode, Color from Normal. I started coloring but this time I decreased the size of the brush and change the brush from soft to hard.

STEP TEN:
Now about the teeny tiny reflection. I decreased the size of brush some more. Change the foreground color to a bit lighter than the eye color you selected and color it.
 STEP ELEVEN:
Add a new layer for the hair. Again by using the Path tool, make the selection around the hair. Don't worry about not being precise about it.
 STEP TWELVE:
Choose a specific color. It took me a lot of minutes to finally decide a proper color. This time I changed the mode from Color to Overlay because with Color, the right shade was just not standing out. Now just, color it all around the hair with a soft brush.
 STEP THIRTEEN:
Now comes a little tricky part. Add a new layer, naming it 'Skin'. In order to not color out the eyes and lips, I used the path tool and selected everything but eyes and lips from the path. For choosing the right skin color, I used the Skin Color Chart, you can look it up on google. Now all you have to do is Open the skin color chart as a layer for a temporary time.
 STEP FOURTEEN:
Now, I know previously the skin looked a lot Orange-ish. So I duplicated the layer. This time changing it's mode from Color to Multiply. Now I have two skin layers; One of them is Color, the other one is Multiply.
 STEP FIFTEEN:
For the background now, I thought it's better if the background compliments her dress. Therefore, I selected a dark shade of blue. With new layer selected, named as background. I started coloring it in a Color mode.
 STEP SIXTEEN:
Change the layer mode from Color to Overlay. So now I have two background layers;
One of them is simple Color mode
The other is one is made by using the Blend tool with Overlay mode.
Erase the imperfections and save your picture.

Open the picture you want to colorize in the software. Make sure it's in HD quality. We don't want a picture which is in not so nice quality since this is our first basic tutorial. In my case, I chose a picture of Miranda Kerr.
For each part, we'll be working on different layers. Clothes, eyes, lips, skin, hair and background will have different layers. Click on layer and add a new layer. A pop up box will appear where you have check on the transparency option at the bottom. Name the layer according to the part you want to color first. I always start off by coloring the clothes.
On the selected layer, which in my case is clothes, change the mode from normal to color. Select your desired color, I am going for a light purple color which will change a bit because of the mode. Select the brush tool, from the tool box and start coloring back and forth.
It will look something like this. Don't worry about messing up, if you do.
Now, moving onto the lips. Again I added a new layer, named it 'lips' and started coloring it with soft brush. Make sure your mode is color and not normal.
Since I was messing up that is, accidentally coloring the skin red. I am going to select the path tool from the tool box. Path tool helps you select a certain part of your picture via the path you created. Just create a path around the lines of lips.
Make sure you connect the initial point with the final point. Once the path the is created, right click anywhere on the picture. Put your cursor on 'Select' and click on 'From Path'.
Now that on lips are selected, freely color all around the lips because it won't color outside the boundary or path you created.
Again repeating the previous step, I added a new transparent layer and named it eyes. I googled a picture of Miranda Kerr to see her eye color. I think blue looks pretty cool. Selecting the mode, Color from Normal. I started coloring but this time I decreased the size of the brush and change the brush from soft to hard.
Now about the teeny tiny reflection. I decreased the size of brush some more. Change the foreground color to a bit lighter than the eye color you selected and color it.
Add a new layer for the hair. Again by using the Path tool, make the selection around the hair. Don't worry about not being precise about it.
Choose a specific color. It took me a lot of minutes to finally decide a proper color. This time I changed the mode from Color to Overlay because with Color, the right shade was just not standing out. Now just, color it all around the hair with a soft brush.
Now comes a little tricky part. Add a new layer, naming it 'Skin'. In order to not color out the eyes and lips, I used the path tool and selected everything but eyes and lips from the path. For choosing the right skin color, I used the Skin Color Chart, you can look it up on google. Now all you have to do is Open the skin color chart as a layer for a temporary time.
By selecting the color picker tool, with the color chart layer selected, pick a color from the chart and experiment around the skin. If the color suits, start coloring around the skin. In my case, with mode selected as Color, I started coloring the skin with soft brush.
Now, I know previously the skin looked a lot Orange-ish. So I duplicated the layer. This time changing it's mode from Color to Multiply. Now I have two skin layers; One of them is Color, the other one is Multiply.
Play around the Opacity of both the layers (Just below the mode), until you are satisfied.
For the background now, I thought it's better if the background compliments her dress. Therefore, I selected a dark shade of blue. With new layer selected, named as background. I started coloring it in a Color mode.
It obviously looked as though it was colored so to make it look a bit realistic. I added another transparent layer. Select the Blend tool (Gradient tool) from the tool box. The foreground colors are the same shade of blue and white. Drag your cursor center diagonally around the picture. It will look something like this.
Change the layer mode from Color to Overlay. So now I have two background layers;
One of them is simple Color mode
The other is one is made by using the Blend tool with Overlay mode.
Erase the imperfections and save your picture.
This is the end product!
I hope you liked this tutorial and it was somehow helpful to you. If you have any questions, feel free to leave them in the comments below and I'll answer them for you.
If you wish to show me your recreations via this tutorial then just link them down below.
Share this with people who you think will be interested!
Until then,
SL signing off!

0 comments:
Post a Comment